
Learn online DBMS “Create Table Command in MySQL” Complete Lesson 8
CREATE TABLE COMMAND
This command is used to create a new table or relation. The syntax for this command is :
Create Table <table name>
( <column 1><data type> [constraint] ,
<column 2><data type>[constraint],
<column 3><data type>[constraint]
);
where []=optional
The keyword “Create Table” is followed by the name of the table that you want to create. Then within parenthesis, you write the column definition that consists of column name followed by its data types and optional constraints.There can be as many columns as you require. Each column definition is separated with a comma (,). All SQL statements should end up with a semicolon (;).
The data types most commonly used are list in :

Thus to create the following relation schema in SQL: EMPLOYEE(Name, Employee_ID, Gender, Salary, Date_of_Birth), the SQL command would be:
Create Table EMPLOYEE
( Namevarchar(20),
Employee_IDinteger,
Gender char(1),
Salaryinteger,
Date_of_Birth Date
);
Click on MySQL 5.6 Command Line Client in the Start Menu:

Following command line window will open:

Enter the password as you have entered during the installation of MySQL community server 5.6.14. After entering the password, you can see the MySQLmonitor:
You can now type the SQL commands on the mysql> prompt.
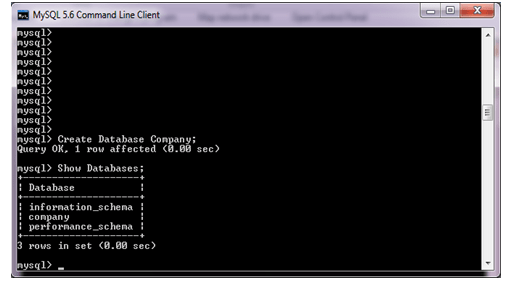
Now the next step is to create a database using the “Create Database” Command. The “Company” database is created as shown below:

You can verify the creation of the database by using “Show Databases” command which shows all the databases that currently exist on the server.
In case you want to drop the database then this can be done by using the “Drop Database” command.

Next step is to tell the server which database we will use for further statements. Thus this can be done by using the “Use” command.

Note: use command does not require a semi colon(;) at the end. Although it works with a semi colon also.
Now you can create tables which would be associated with the Company database.

As shown above “Show Tables” can be used to find out all the tables created
in the current database.
Constraints can be specified while creating the table as listed below:
- NOT NULL – An attribute value may not be permitted to be NULL. For example, the Name of the employee cannot be NULL. Hence NOT NULL constraint can be specified in this case.
Create Table EMPLOYEE
(
Name varchar(20) NOT NULL,
Employee_ID integer,
Gender char(1),
Salary integer,
Date_of_Birth Date
);
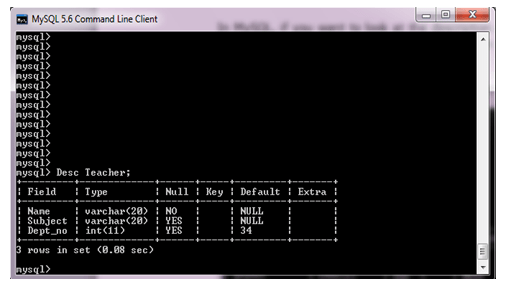
DEFAULT – If a user has not entered a value for an attribute, then default value can be specified while creating the table. For example, by if a teacher’s department value has not been entered, then by default the database should store 34. This can be specified as follows:
Create Table TEACHER
(
Name varchar(20) NOT NULL,
Subject varchar(20),
Dept_nointeger DEFAULT 34
);
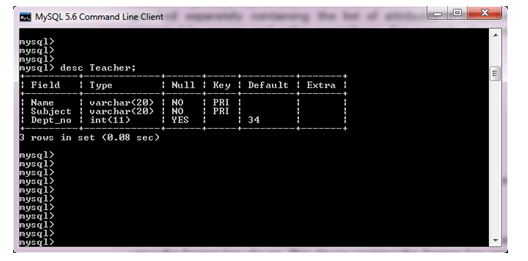
In MySQL, if you want to look at the structure and description of the tables created, “desc” command can be used. The description of the table Teacher created above is as follows:
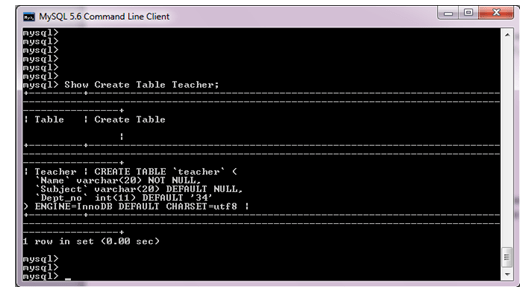
If you want to view the “Create Table” command that was used to create a named table then this can be done by using the “Show Create Table” command as shown below:
CHECK – In order to restrict the values of an attribute within a range then CHECK constraint can be used. For example the age of an employee must be > 18 and < 60. This can be specified as follows:
Create Table EMPLOYEE
(
Name varchar(20) NOT NULL,
Employee_ID integer,
Gender char(1),
Salaryinteger,
Age integer CHECK (Age>18 AND Age<60)
);
You can also use the CHECK constraint to compare two attributes within the same relation having same data type. For example:
Create Table EMPLOYEE
(
Name varchar(20) NOT NULL,
Employee_IDnumber(4),
Manager_IDnumber(4),
Gender char(1),
Salary integer,
Age integer CHECK (Age>18 AND Age<60),
CHECK (Manager_ID<Employee_ID)
);
Thus the CHECK constraint ensures that the ID of the manager is less than the ID of the employee.

KEY CONSTRAINT – Primary Key of a table can be specified in two ways. If the primary key of the table consist of a single attribute, then it can follow the attribute definition. If Employee_ID attribute of the
EMPLOYEE relation should be the PRIMARY KEY then it can be specified as follows:
Create Table EMPLOYEE
(
Name varchar(20) NOT NULL,
Employee_ID integer PRIMARY KEY,
Gender char(1),
Salary integer,
Age integer
);
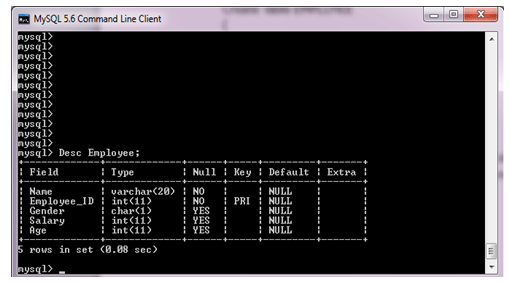
As shown above Name has value “NO” in the Null column as during it was specified as NOT NULL in the Create table command and Employee_ID is the primary key (PRI in the Key column).
However if primary key contains more than one attribute then it must be specified separately containing the list of attributes it composes of separated by comma and within parenthesis. For example, the primary key of the TEACHER relation is Name and Subject.
Create Table TEACHER
(
Name varchar(20),
Subject varchar(20),
Dept_no integer DEFAULT 34,
PRIMARY KEY (Name,Subject)
);
By default, Primary keys are NOT NULL hence there is no need to mention this constraint.
As shown below, both Name and Subject are shown as Primary keys.
REFERENTIAL INTEGRITY CONSTRAINT – This constraint is specified by using the foreign key clause.This clause contains the foreign key and the primary this foreign key refers to along with the name of the relation. For example consider the following tables created in the School Database:
Department (Dept_Name, Dept_ID, No_of_Teachers)
Teacher (Teacher_Name, Teacher_ID, Dept_No, Subject)
Where Dept_No is the foreign key that references Dept_ID of Department relation.
The SQL command for creating these tables would be as follows:
Create Table Department
(
Dept_Namevarchar(20) NOT NULL,
Dept_ID integer PRIMARY KEY,
No_of_Teachers integer
);
Create Table Teacher
(
Teacher_Namevarchar(20) NOT NULL,
Teacher_ID integer PRIMARY KEY,
Dept_No integer,
Subject varchar(20),
FOREIGN KEY (Dept_No) REFERENCES Department(Dept_ID)
);
The foreign key is created separately by using the key words FOREIGN KEY followed by the attribute that is the foreign key within parenthesis, then the keyword REFERENCES followed by the name of the referred relation and its primary key with parenthesis.
Following is the code to be written in MySQL to create foreign key:
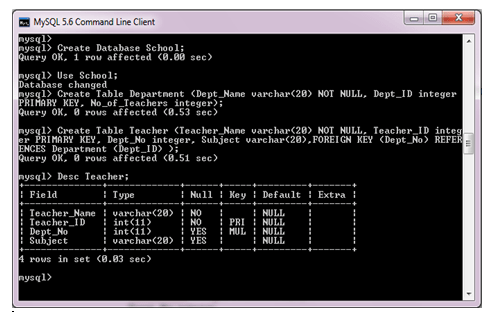
As shown in the Figure above, the Key column for Dept_No contains “MUL” which implies multiple occurrences of a given value can appear within the column.Also because it is a foreign key.
Note that the referenced table (or primary key) must be created before it is referred in any other table.
You can also specify the action to be taken in case the foreign key attribute or the primary key attribute value are changed as that may result in violation of the referential integrity constraint. Thus following are two possibilities that can be taken care of:
- ON DELETE
- ON UPDATE
Actions that can be taken are as follows:
- SET DEFAULT
- SET NULL
- CASCADE
Let us discuss each in detail:
Create Table Teacher
(
Teacher_Namevarchar(20) NOT NULL,
Teacher_ID integer PRIMARY KEY,
Dept_No integer DEFAULT 234,
Subject varchar(20),
FOREIGN KEY (Dept_No) REFERENCES Department(Dept_ID) ON
DELETE SET DEFAULT ON UPDATE SET DEFAULT
);
Thus if a value of Dept_ID is deleted in Department table, then the corresponding tuplesthat contains the deleted value for Dept_No attribute in Teacher table would be set to its default value i.e, 234 and if any value is updated then also the corresponding attribute in Teacher table would be set to its default value.
Create Table Teacher
(
Teacher_Namevarchar(20) NOT NULL,
Teacher_ID integer PRIMARY KEY,
Dept_No integer DEFAULT 234,
Subject varchar(20),
FOREIGN KEY (Dept_No) REFERENCES Department(Dept_ID) ON
DELETE SET NULL ON UPDATE SET NULL
);
In the above table, if the value of the Dept_ID attribute in Department table is deleted or updated, then the corresponding value in the Teacher table would be set to NULL.
Create Table Teacher
(
Teacher_Namevarchar(20) NOT NULL,
Teacher_ID integer PRIMARY KEY,
Dept_No integer DEFAULT 234,
Subject varchar(20),
FOREIGN KEY (Dept_No) REFERENCES Department(Dept_ID) ON
DELETE CASCADE ON UPDATE CASCADE
);
In the above table, if the value of the Dept_ID attribute in Department table is deleted, then the corresponding value in the Teacher table would also be deleted and if any value is updated then the corresponding value would also be updated.
Naming of Constraint:Constraints can be named in the Create Table command. The advantage is that named constraints can easily be deleted or updated using the Alter Table command. A constraint can be named by using the keyword CONSTRAINT followed by the name of the constraint and its specification.
For example consider the following Create Table command:
Create Table Teacher
(
Teacher_Namevarchar(20) NOT NULL,
Teacher_ID integer,
Dept_No integer DEFAULT 234,
Subject varchar(20),
CONSTRAINT TEACHER_PK PRIMARY KEY (Teacher_ID),
CONSTRAINTTEACHER_FK FOREIGN KEY (Dept_No) REFERENCES
Department(Dept_ID) ON DELETE SET NULL ON UPDATE SET NULL
);
In the above table, the primary key constraint is named as TEACHER_PK and the foreign key constraint is named as TEACHER_FK.