
How to Installing and Configuring MySQL
MySql is the database of choice for a vast majority of Web developers who use PHP, because of its efficiency and ease of use. Plus, MySQL is free and runs on multiple platforms, and its documentation sis superb. When using MySQL and PHP, it’s easiest to install MySQL first, because during the PHP installation and configuration processes, you must tell the PHP configuration script that you plan to use MySQL, in order to activate the MySQL – specific your system, in case there are any library mismatch issues that would cause PHP to fail in its compilation.
Various MySQL Distributions.
The most popular distribution of MySQL is the open source version, from MySQL AB. However, there are also commercial versions of MySQL, as well as distributions of MySQL bundled with with application server software. No matter which option you choose, a solution is available for you on all platforms-any operating system. as well as on Windows 95/98/NT/2000/XP/VISTA.
Installing MySQL on Windows.
The MySQL installation process on Windows 95/98/NT/2000/NT/2003/VISTA is based on an executable setup program provided by MySQL AB. Once you download the zip file, all you have to do is extract its contents into a temporary directory and run the setup.exe application. After the setup.exe application install the MySQL server and client programs, you’re ready to start the MySQL server.
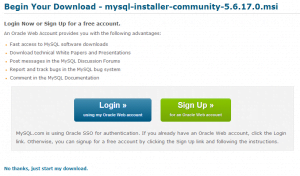
- Visit the MySQL the http://dev.mysql.com/downloads/file.php?id=451576 , by clicking this link you’ll directly enter the MySQL windows page where you can download MySQL windows version. Click the button below the test that says MySQL community server. This will take you to a list of operating systems. Select Windows and then select the Windows Zip/Setup.exe link.
- clicking the “mirror” link will take you to a page of mirror sites. Select the mirror site closest to you and click either the HTTP or FTP link to download the file. Using the HTTP method is usually quicker. Note that you will be presented first with a login screen; you can bypass this via a link at the bottom of the page that says ” No thanks, just take me the download.
- After the zip file (mysql-installer-community-5.6.17.0.msi.zip) is on your hard drive, extract its contents to a temporary directory.

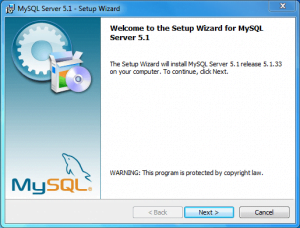
- From the temporary directory, find the setup.exe file and double-click it to start the installation. You will see the first screen of the Installation Wizard.
- The second screen in the installation process asks you which type of installation you want to use. Four our purposes, a Typical installation is fine. The outer types of installation allow you to customize what will be installed and what features you will be using. For the majority of users, the Typical setup is fine. If you want to be sure you have everything you need, select the Complete install. The Custom install is really just for advanced users who are setting up production systems that are very specific. Note that if you want to change the installation location, you will need to customize it using the Custom option.

The third screen in the installation process contains valuable information regarding the installation location. The information on this screen is also important for Windows NT users who want to start MySQL as a service.

- At this point, you are ready to do the installation process. Click the Install button on the screen to begin the installation process.

- Once the installation process is complete, You will see an advertisement for the MySQL Enterprise edition. You can ignore this process.
- The installation process now takes over and installs files in their proper locations. When the process finished. you will see a confirmation of completion. Click Finish to complete the setup process.

- The final step in the process, once the installation is done, is to handle the configuration of the system. The final screen contains a check box that will allow you to do this configuration. Leave the check box checked and click the Finish Button.
- Select the Standard configuration for your machine, since we are working with a system that have never been installed and doesn’t need to be used by others for now. Clicking Next will bring up the main options screen for MySQL, leave the Windows Service box checked, as this is the best way to run MySQL under Windows. We aren’t going to be using the command line tools much, so we will leave the Bin Directory box unchecked. Click Next when you are finished.

- The Next screen is extremly important. You will need to create a PASSWORD for your root (administrator) user. the next button will not be enable until the passwords in the new root password and Confirm boxes are entered and match.


- Finally, this screen does all the setup of your MySQL system. Click the Execute button to finish the installation process.

MySQL is now installed on your system unlike previous version of MySQL, The administration Programs are a separate download. You can find them on the MySQL.com site at the URL http://dev.mysql.com/downloads/tools/. The installation process is quite simple and can be placed in the same location as the MySQL binaries ( the default location is c:\Program Files\MySQL, with the database engine in MySQL server 5.6.17.0 .
WinMYSQLadmin will automatically interpret environment information, such as IP address, machine name, and so on. The tabs along the left side allow you to view system information and also edit MySQL configuration options. The shut down the MySQL server or the WinMySQLadmin tool, right-click again on the stoplight icon in your task bar and select the appropriate choice. As long as the MySQL, server is running, you can run additional applications through a console window, such as the MySQL Monitor.


When i run the setup a message window appears with a message ” This application requires .NET Framework 4.0.” Please tell me whats the solution?
Thanks for read our post…
.NET Framework 4.0 (now latest version .net framework 4.5 is available) is the part of windows since vista. When you want to install MySQL (java based software)in windows platform you must install .net framework on your windows system. Every time when you want to install a non-window software into your windows operating system .net framework act like ActiveX control between mysql and windows. Today most of the computer have pre-installed .net framework. If you dont’t have .net framework you can easily download from Microsoft website.
This is the link of .NET Framework 4.5 Version.
http://www.microsoft.com/en-in/download/details.aspx?id=30653
thank you for guidance…now i have installed MySQL.